Gardenias, with their fragrant white flowers and glossy green leaves, are a popular choice for many gardeners looking to add a touch of elegance to their outdoor or indoor spaces. Propagating gardenias from cuttings is a cost-effective and rewarding way to increase your gardenia collection. Here’s how to successfully propagate gardenias from cuttings and ensure they thrive.
Materials Needed
- Sharp pruning shears or a knife
- Rooting hormone powder or gel
- Potting mix suitable for cuttings (a mix of peat moss and perlite works well)
- Pots or containers with drainage holes
- Plastic bags or a propagation dome
Choosing and Taking Cuttings
- Timing: The best time to take cuttings is in early summer when the plant is actively growing.
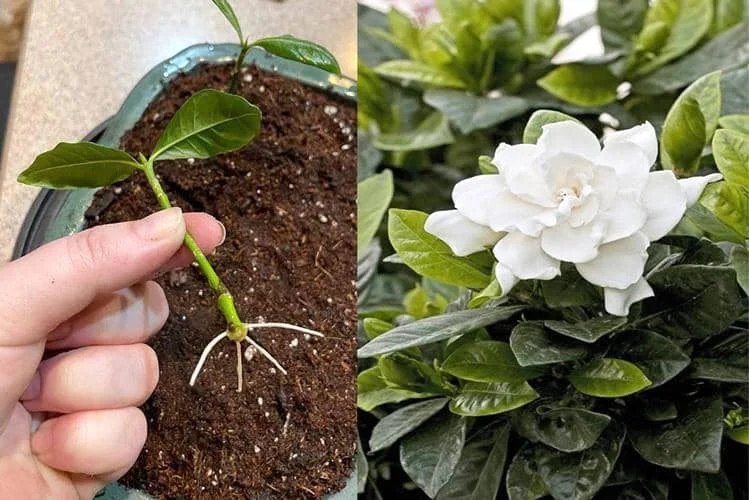
- Selection: Choose healthy, non-flowering stems for your cuttings. Look for semi-hardwood segments, which are parts of the stem that have begun to mature but are not yet fully hardened.
- Cutting: With your clean, sharp shears or knife, cut a 4-6 inch segment from the selected stem, making the cut just below a leaf node (the point where leaves emerge from the stem). Remove the lower leaves, leaving two or three at the top.
Rooting the Cuttings
- Rooting Hormone: Dip the cut end of the cutting into rooting hormone. This encourages root growth and helps prevent disease.
- Planting: Fill your pots with the moistened potting mix. Make a hole in the center of the potting mix with a pencil or your finger. Insert the cutting about 1-2 inches deep into the hole and gently firm the soil around it.
- Environment: Place the pot in a warm, bright location out of direct sunlight. You can cover the pot with a plastic bag or place it under a propagation dome to maintain high humidity, which is crucial for rooting success. Make sure to provide ventilation by opening the bag or dome for a few hours each day to prevent mold growth.
- Watering: Keep the potting mix lightly moist but not waterlogged. Overwatering can cause the cutting to rot.
Aftercare for Rooted Cuttings
- Rooting Check: In 4-8 weeks, gently tug on the cuttings to check for resistance, indicating root growth. Once rooted, gradually acclimate them to less humid conditions by removing the plastic covering for longer periods each day.
- Transplanting: After the cuttings have established a good root system, they can be transplanted into larger pots or directly into the garden if the climate allows. Use a well-draining soil mix and choose a location that receives partial shade to avoid burning the delicate leaves.
- Watering and Feeding: Keep the soil consistently moist but not soggy. Feed your gardenias with an acid-forming fertilizer according to the product instructions to encourage growth and blooming.
- Pruning: Prune gardenias in early spring to maintain their shape and encourage bushy growth. Always remove any dead or diseased branches to keep the plant healthy.
Common Pests and Problems
Gardenias can be susceptible to pests such as aphids, spider mites, and mealybugs. Regularly inspect your plants and treat them with insecticidal soap or neem oil if pests are detected. Gardenias prefer acidic soil; yellowing leaves may indicate a pH imbalance, which can be corrected with soil amendments.
By following these steps, you can successfully propagate gardenias from cuttings and enjoy their stunning blooms and sweet fragrance for years to come. With a little patience and proper care, your gardenia cuttings will grow into healthy, flourishing plants.